Chocolate

How to Make Chocolate Roll Snack Cakes at Home

October 27, 2015

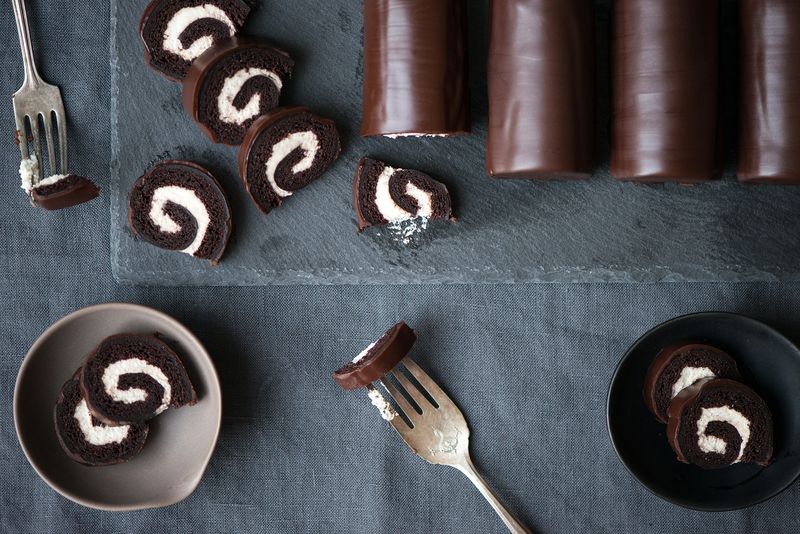
These rolled chocolate cakes are slightly more sophisticated version of the original beloved Swiss Rolls snack cakes.

My version is a fresh chocolate sponge cake, rolled up in a mascarpone vanilla bean whipped cream and covered in a velvety dark chocolate glaze. Enjoy it as one giant cake roll (like a roulade), or divide it up into miniature portions. 

Shop the Story

Chocolate Roll Snack Cakes

Makes eight 3-inch cakes

For the chocolate sponge cake:

2 ounces Dutch-processed cocoa powder
2 ounces hot water
1 1/2 teaspoons vanilla extract
2 tablespoons unsalted butter, soft at room temperature
5 ounces sugar, divided
4 ounces egg yolks
7 ounces egg whites (from about 6 large eggs)
Cocoa powder, for dusting

For the mascarpone vanilla bean whipped cream:

8 ounces heavy cream
4 ounces mascarpone cheese
1 ounce sugar
1 teaspoon vanilla extract
1 vanilla bean, split lengthwise and seeds scraped

For the chocolate glaze:

8 ounces dark chocolate, 60 to 70%
6 ounces unsalted butter
1 teaspoon honey

Start with the cake. Preheat the oven to 350° F and prepare a 17- by 11-inch baking sheet by lightly oiling the bottom and sides, lining the bottom with parchment paper, and then lightly oiling again. In a small bowl, combine the cocoa powder, hot water, vanilla extract, and butter. 

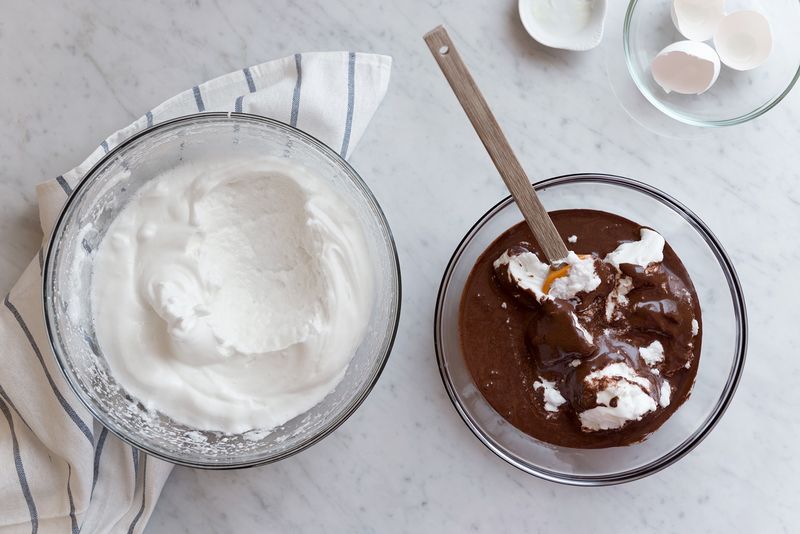
In the bowl of a stand mixer, add 4 ounces of the sugar and the egg yolks. Whip on medium-high until light pale yellow in color and fluffy (about 5 minutes). Add the chocolate mixture and whip until combined. Scrape down the bowl and mix in any stray bits. 

In a clean large bowl, whip egg whites until soft peaks form. Gradually, add in the 1 ounce of remaining sugar while continuing to whip until stiff peaks form. Using a spatula, fold 1/3 of egg whites into egg yolk-chocolate mixture to lighten it. Fold in another third and finally, the remaining third. 

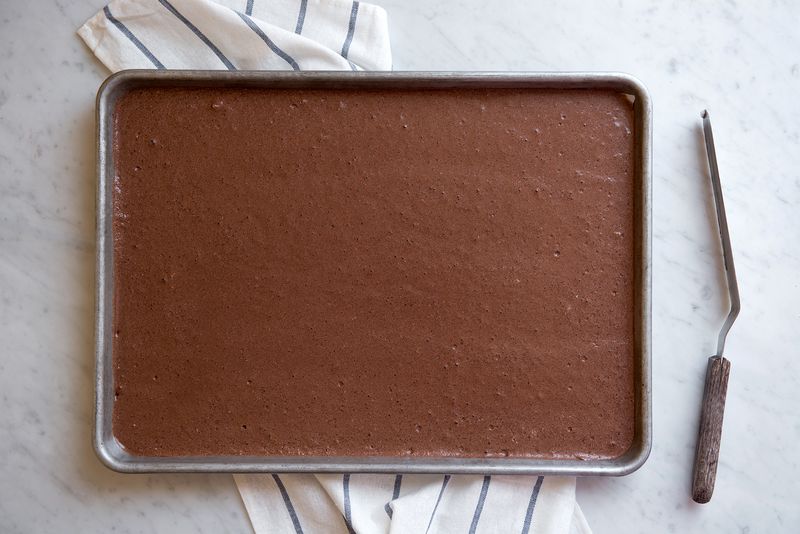
Pour batter into the prepared baking sheet and evenly smooth out with an offset spatula. Bake for 17 to 18 minutes, until the edges of the cake pull away slightly from the sides of the baking sheet. 

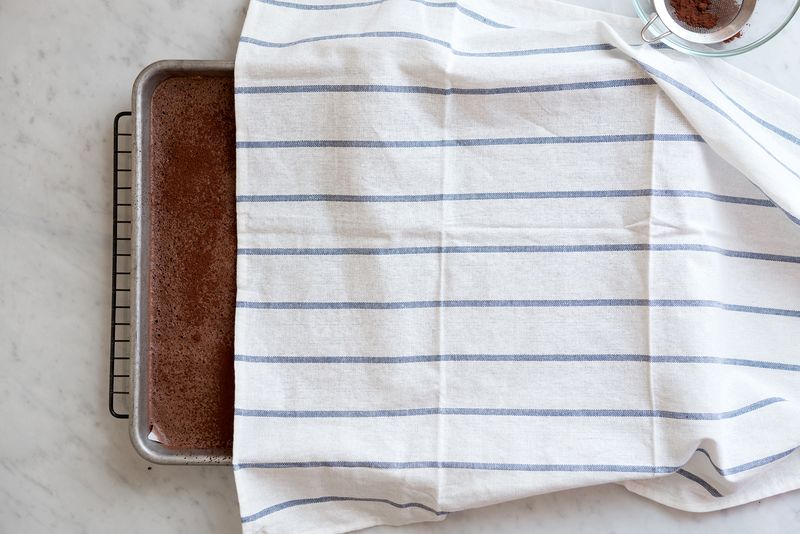
Set on a cooling rack and lightly dust entire surface with cocoa powder. Place a damp kitchen towel over the cake and let cool. 

Make the mascarpone vanilla bean whipped cream. In the bowl of a stand mixer, or with a hand-held mixer, whip all the ingredients together just until stiff peaks form and the filling holds its shape when spread. 

For the glaze, combine dark chocolate, butter, and honey in a bowl and melt over a double-boiler. Remove from heat and let cool slightly. (You can also place all ingredients in a microwave-safe bowl and heat for 1 minute. Stir mixture, then heat for 15-second intervals, mixing at each interval, until melted. Do not overheat or it will burn the chocolate.)

The glaze should be warm and fluid for glazing (it shouldn't be too hot or it will run off the cakes and melt the filling).

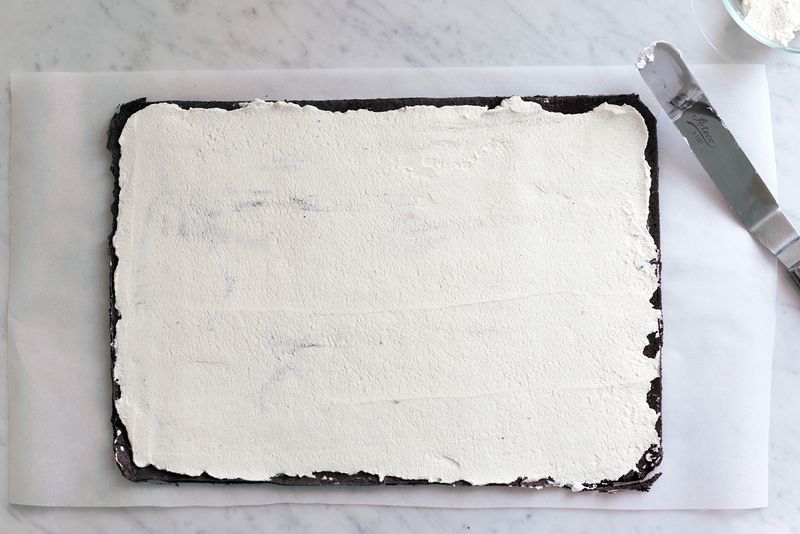
To assemble the rolls, carefully remove the cake from the pan and transfer to a flat work surface. With an offset spatula, evenly spread the whipped cream filling over the entire surface. Use a knife to trim off the edges of the cake and cut the cake into four sections. Cut through the parchment paper to keep it attached to each cake section.

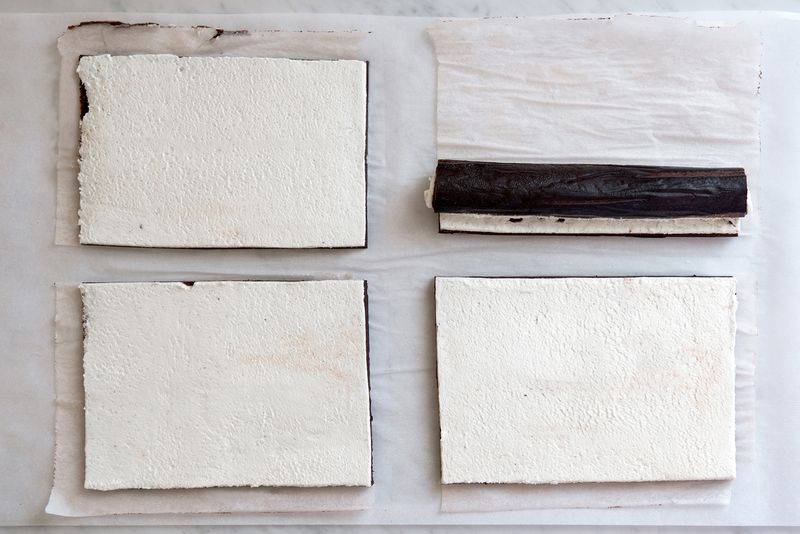
Roll each section up one at a time, beginning with the longer side of each section. Carefully curl the edges up and use the parchment paper for support. Gently peel away the parchment as you roll it up. Once complete, place the rolls in the refrigerator for 20 to 30 minutes to firm up the filling.

Neatly trim off the ends of each cake roll section and cut each section into 3-inch portions (cutting each section in half should give you around 3 inches). On a flat work surface, place a wire cooling rack over a sheet of parchment paper or foil and evenly space the cakes on the rack for glazing. 

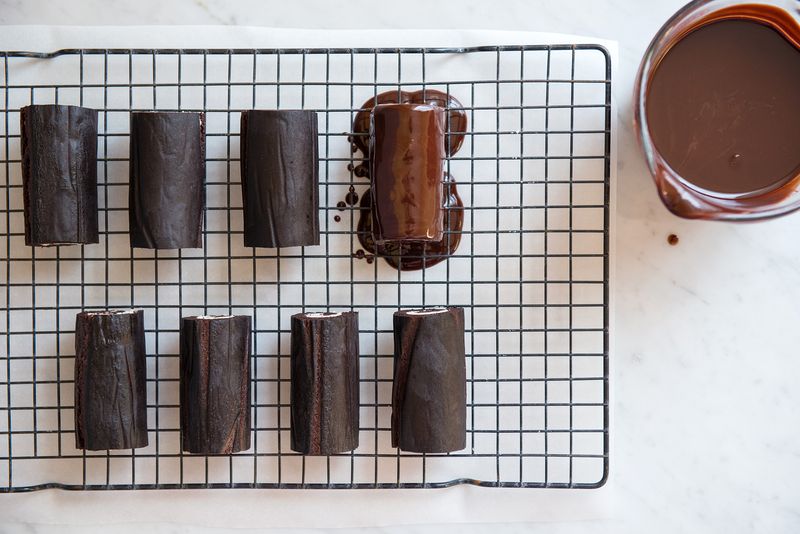
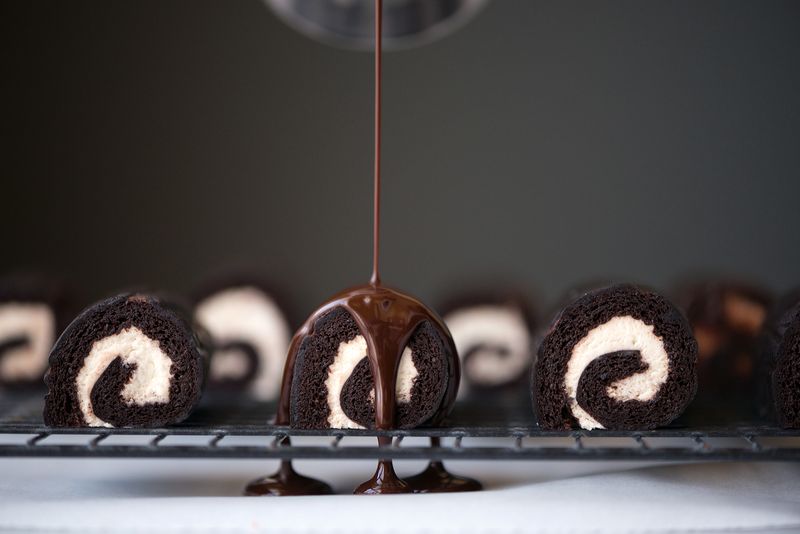
Pour the fluid glaze over each snack cake until it's completely enrobed in chocolate. With an offset spatula or a fork, carefully transfer each glazed snack cake onto a plate for serving.

If not serving right away, place them all onto a small baking sheet, cover lightly with plastic wrap, and store in the refrigerator until ready to serve (up to 2 days). Let them come to room temperature before eating for the softest and best experience. 

See the full recipe (and save and print it) here.

Photos by Teresa Floyd

See what other Food52 readers are saying.

  • Paula
    Paula
  • Cindy Halbersma
    Cindy Halbersma
  • kldesjohn
    kldesjohn
  • Kim Sollien
    Kim Sollien
  • marydtoombs
    marydtoombs
Teresa Floyd is a freelance photographer, food writer, and pastry chef living in Kansas City, MO. She is the creator of Now, Forager, a pastry blog focused on seasonal pastries and desserts.

27 Comments

Paula April 13, 2021
Am I missing it or do you not have a print tab?
 
Paula April 13, 2021
Never mind 🤦🏻‍♀️🤷🏻‍♀️
 
Cindy H. March 8, 2021
These taste really good, but the cake didn't come out smooth, so the ganache wasn't sleek and smooth. The cake came off the paper easily, but not smooth. As a result, the presentation isn't very pretty. Any ideas on how to fix that?
 
kldesjohn May 16, 2017
Made these and they are wonderful. Thoughts about the pan size being listed incorrectly. I used a jelly roll size as stated but I think a half sheet pan would have worked better. Is this an error in the directions?
 
Kim S. February 4, 2017
This is a really good recipe. The sponge cake, filling, and the ganache all pair perfectly. And its gluten free! Don't be afraid of all the steps, pretty easy cake to make.
 
marydtoombs March 2, 2016
Do you think the big roll (before being cut into the smaller rolls) would feed 10-12 ten-year-old boys for a bday party?
 
Teresa F. March 4, 2016
Hi Mary! If you cut the cake slices on the thinner side, then you might be able to squeeze out 10-12 slices. If you're wanting to serve thicker slices, then making two chocolate roll cakes would be the best option. Happy Birthday to the birthday boy!
 
Kay J. October 29, 2015
My friend taught me to roll up the cake while it is still warm. She used to use a damp pastry cloth or glass-dying towel. I use pastry paper. Let is cool down further, then unroll, fill and re-roll. It's still a delicate business.
 
Teresa F. October 29, 2015
Thanks for the great tips, Kay! Hope you enjoy it when you make it.:D
 
Kay J. October 29, 2015
I do, I do, I do want to make it!
 
Lil C. October 29, 2015
These look delicious and just beautiful! Can't wait to try to make these. I love Swiss rolls but not those store bought kind. I love the idea add cherries to the filling.
 
Teresa F. October 29, 2015
Thank you Lil C!
 
spearsas October 29, 2015
I was thinking about adding roasted cherries to the whipped cream filling to make black forest Swiss rolls. Have you ever added any other ingredient to the filling? Do you think this will effect the ability for the cake roll to stay rolled together?
 
Teresa F. October 29, 2015
Hi Spearsas! Oooh, I love that idea. I have not attempted to add other ingredients to the filling, but you should be ok to do this as the cake is moist and flexible. If the cherries are big maybe chop them into smaller pieces just to be safe. Also, if they are still pretty juicy try and pat them dry a bit so they don't dissolve any of the filling. Good luck and thanks for sharing this idea!
 
spearsas October 29, 2015
Thanks, Teresa! Good points on the cherry texture and potential moisture issues - I can't wait to try these out :)
 
Judy October 28, 2015
There really is no flour in the recipe?
 
Teresa F. October 28, 2015
Hi Judy! Correct. There is no flour in this recipe. The stability of the cake relies on the air that's whipped into the yolks & whites. The small amount of cocoa powder helps as well. The outcome is a light & fluffy cake.
 
Bella B. October 27, 2015
Looks so delicious my mouth is watering! I will definitely have to make these!

xoxoBella | http://xoxobella.com
 
Cotton-Top P. October 27, 2015
Can't wait to give this a go! Beautiful photos, per usual!
 
Teresa F. October 27, 2015
Thanks so much, Holly! Happy that you enjoyed the post.
 
Niknud October 27, 2015
That looks ridiculous! Upon reading the recipe I've also decided it looks like it will end (for me) with heartbreak, dispair and broken sponge cake....I may just confine myself to drooling over the pictures. ;)
 
Teresa F. October 27, 2015
Hi Niknud, I vote that you give this a try.;) The sponge is moist and you stand a good chance. Thanks for the kind words!
 
Niknud October 27, 2015
Oh alright, you talked me into it. But I reserve to post my 'nailed it' picture later. You make it look so easy!
 
Teresa F. October 27, 2015
Lol Deal! I believe in you.
 
Leandra October 27, 2015
yaaaaaaas
 
Teresa F. October 27, 2015
Lol So glad you like them, Leandra!:D
 
Joseph S. September 1, 2018
I am going to try this. I have exactly 2 cakes under my belt...I'm intimidated but resolved!